Sunday 31 May 2020

Adobe Photoshop - Day 6 (May)

WHAT I DID TODAY:


Today I did a photo manipulation glow type of effect edit. It's basically me just learning how to make it look like there's light reflecting off of something to make photos with light more realistic.


This was the tutorial I was following:


Just in case you were wondering, I followed a different tutorial than what I posted yesterday because the other tutorial I was going to follow was too fast. Even though I slowed down the video to like 0.25 or something I still couldn't catch what they were doing thus I followed this new tutorial I found.


This is the original photo I used: (it wasn't a stock photo, this was taken off Instagram thus the quality)


This is my recreation:


It honestly didn't really have much of a clean light effect as I hoped, but it's because of the photo quality and the image I specifically chose. I think if I chose a better photo the edit quality could've been better, but I still am satisfied with this, it looks pretty nice in my opinion.


I also got to use something I learned a few posts ago! I used the filter that turned images to night time from day time, and I decided to use it here to make the image look dark and so the glow has more of an impact.


Other than that this edit was also very simple. I just placed a png from google then added an outer glow effect.


WHAT I LEARNED:


Basically, all I learned today was how to add an outer glow effect, but there were also a ton of extra options that I didn't know was there.
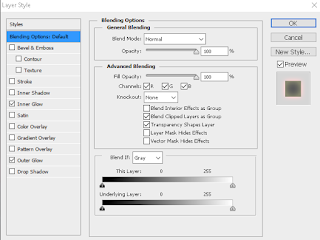

blending options


I didn't know that you could right-click on a layer then go to blending options then all these kinds of options would pop up. Before I would've probably just used the brush tool or something and lower the opacity to create a glow effect, but now that I learned there was an easier way, this is even better.


For this edit, I added an inner glow as well as an outer glow, as you can see in the photo above.

This was a pretty simple edit, but once again I got to learn some 


WHAT I WILL BE DOING TOMORROW / NEXT TIME:


Next time I will be following this tutorial:


Friday 29 May 2020

Adobe Photoshop - Day 5 (May)

WHAT I DID TODAY:


Today in photoshop, I edited a picture of someone's face and tried to remove their acne/blemishes.

This was the tutorial I was following:


This is the original stock image I found:


This is my final edited work:


I have to admit it does look pretty unrealistic at times from how I edited it, but I think it is pretty good or satisfactory I should say for my first try.


The image I chose though was a really bad choice (I had no choice though because there were barely any free stock images for this) because it was already a pretty blurry image by itself pre-editing, and when editing this, I needed to add on a ton more of blur effects and tools which kind of made the photo unnecessarily even more blurry, which did not result in a clean final.


For this edit, I duplicated the original photo layer, then added a mask to that layer and from there added effects to the masked layer.


WHAT I LEARNED:


- The first thing I learned about today is the spot healing brush tool. I always knew this tool existed but for some reason, I really never got to or needed to interact with it(?) 


After blurring the entire skin out, there were still leftover redness/blemishes, and from there that's when the spot healing brush tool came in. It kind of just made the blemish disappear with one click, but as much as it sounds really good, it slightly changes the skin color so at times there's a random patch of darker skin compared to the original. This is why the edit wasn't super easy as I had to try to match the skin tone with everything and the quality of the blur.


- The second thing I learned was that when I was trying to erase some parts of the masked layer (so parts of the original images come back to where I need) it didn't work at times. I then learned that the brush colors matter when you try to do that.


What I mean by that is that the two brush colors have to be black and white, in that designated order, or it wouldn't work.

colors order

This is what I mean by the brush color has to be black and white in order to erase the masked image.


WHAT I WILL BE DOING TOMORROW / NEXT TIME:


Tomorrow I will be doing a glow effect. It isn't just any glow effect though because it's going to be about making it more realistic with the glow reflecting off objects. 

This is the tutorial I plan to follow:


Adobe Photoshop - Day 4 (May)

WHAT I DID TODAY:


Today in photoshop, I attempted my best to convert a photo that was taken at daytime to nighttime. I feel as if this effect is really realistic and can be helpful in many ways, that's why I wanted to learn how to do it.


This was a super simple edit honestly, but surprisingly I barely used the tools I often used instead, I used other tools that I wouldn't generally use on my own which is pretty cool. I will talk about it more on my 'What I Learned' section.


This was the tutorial that I was following..


This was the original photo I grabbed off of Pexels:


UNEDITED PHOTO


This is my final product:


MY FINAL EDIT


WHAT I LEARNED:


I am not going to lie, this edit was extremely easy and simple, however, I learned a lot from it which was what I was aiming for kind of.


- The first thing I learned was that in Photoshop, there are preset looks/filters(?) I honestly don't know what the official name for it is but I would basically describe it as preset filters with specific themes. For example to elaborate on that, if you select the 'sunset filter' that automatically colors your photo to look as if your photo has sunset vibes on it.


THE COLOUR/FILTER OPTIONS


Hopefully, the photo makes it easier to understand what I'm trying to get at, but basically, in this edit, all I had to do was press the 'Night from Day' option. It literally did all the work for me, all I had to do from there was create another layer to make the lights shine to make it look realistic.


- The second thing I learned about wasn't super huge or new but it was the polygonal lasso tool. I never really used it before but for this edit, I outlined multiple places then went over with a brush to make the light show up.


WHAT I WILL BE DOING TOMORROW / NEXT TIME:

So the next thing I am doing might seem a bit weird, but this is really helpful and people sometimes even get paid to do these kinds of edits. You might have already guessed or not but it's about retouching faces. 


This is the tutorial I am planning to follow tomorrow.

Thursday 28 May 2020

Adobe Photoshop - Day 3 (May)

WHAT I DID TODAY:


Today I followed this tutorial edit, where it transforms a picture, into a comic style art. This consisted of just using tons of filters and colours. 


This is the tutorial I followed:


This was the original photo I used;


This photo is from a Korean drama


This is my final finished edit;


My final edit


This was a really nice turnout in my opinion. I think it's one of my few edits that I'm very happy with because it looks really cool and legit. And for once it seems clean and not messy like some of my past edits. I also got to play with a bunch of effects I didn't know existed before, so I got to learn quite a bunch of new things with this effect.


WHAT I LEARNED:


So as I expected when going into this tutorial, I knew I would be learning more about filter effects and adjusting different hues/saturation. (which is what I need to work more on to get the idea of it and doing things by myself.)


- The first thing I learned was that there was a filter effect that instantly blurs everything! This was very simple, but I saw this effect often everywhere on social media when people edit their photos, and I didn't have a really clear specific way of knowing how to do it, but now I know.


All I had to do was go to the top bar Filter < Blur , then from there, it blurs everything. I kind of don't understand how the blur played out in this edit, because everything ended up looking sharp, but it still did teach me how to do it.


example of how the blur effect works


- The second thing I learned was that if there is a png photo, which is like the spikey things in the photo, instead of personally erasing the background, you can most times just go to blend effects and click the correct blending option to delete the transparent backgrounds from pngs.


WHAT I WILL BE DOING TOMORROW / NEXT TIME:


Considering how I've been working on digital art for 2 days in a row now, I will switch it up and do something different. I want to work more on photo manipulation, and something that could potentially be helpful in the future.


This is the tutorial I will be following next. If it's not obvious from the thumbnail it's basically converting a photo from daytime to nighttime. 

Tuesday 26 May 2020

Adobe Photoshop - Day 2 (May)


WHAT I DID TODAY:

Today, I was going to follow a tutorial on this glow in the dark effect that I posted yesterday, but I found something cooler and decided to follow through with it. Today I made a cartoon-ish portrait/painting in photoshop. 

-I followed this tutorial..


This took me much longer than I anticipated. I actually thought it was going to take me 2 days or something to fully complete this but I just tried to finish everything in a day.

This is the original photo/reference:


This is the final product:


I used the pen tool, filling in colours, and the brush tool.


WHAT I LEARNED:

Today I learned how to use the pen tool. Before I've always just been using either the eraser or quick selection tool/magic wand but now I realize the pen tool is really easy to use especially when drawing/painting. It works well with curves and just in general it is a really helpful tool that I wish I knew about sooner.


I learned that most people actually use this method to draw online and that it's much easier than people actually think.


How to draw with the Pen, Curvature, or Pencil tool in Illustrator
ex of pen tool


The diagram above shows how pen tool works. You just connect the dots and it forms the shape of anything you want.


WHAT I WILL BE DOING TOMORROW / NEXT TIME:


After doing this effect, I suddenly became really interested in digital art, so I found another cool effect I want to try. It's like converting a specific image into a comic book type of art. This is the tutorial I found.


Monday 25 May 2020

Adobe Photoshop - Day 1 (May)

WHAT I DID TODAY:

So due to circumstances, I am not able to continue my previous project which is the After Effects glowing effect video. After thinking about what I can transition to, with so little time left, I decided to venture out to Photoshop. 

I was originally thinking about doing coding again however, I came to a realization that there isn't much time left until the semester ends, and I wouldn't have enough time to be able to learn enough in order to do a final coding project. I thought about what I can do that will still help me in the future, what I enjoy, and something that enables me to start anywhere and working at any pace.


My plan for the rest of the following blog posts will be me following photoshop tutorials and then re-creating my own edits. (So basically what I was doing for video editing) This way, I am able to learn a bunch of new things and develop new skills at the same time. Despite having done photoshop before in the past, I never really got to spend an adequate amount of time on it, so I think it's a good idea to do this and fully develop my skills.


- My first photoshop tutorial that I plan on learning is, a silhouette type of edit. This seems like a good first edit and it's really cool so I want to learn it.


This is the video tutorial that I will be following along with.


After following the tutorial, this is the final edit I came up with.

my final product


This was a really good first assignment/tutorial for me as it kind of eases me back into photoshop, a well as it plays around with selection tools, masking, and colour effects. For this edit, I used 3 different images. I used a photo of a couple, a moon, and the ground in order to create that final product.


WHAT I LEARNED:


So since I have done photoshop before, this project contained things that I've somewhat learned/done before. However I did learn something though.

I didn't learn anything new in photoshop itself but I did learn something in the process of making this edit.

I believe that looking for images was the hardest and longest part when photoshopping sometimes. When I was searching for potential images for my edit, it actually took me quite a while because I learned the hard way that it's definitely better to use high-quality images, which Google did not offer often. I realized that though after editing a few images from google that did not work out well in the end.

I then learned about stock images. There are a few websites that offer thousands of free high-quality images that are perfect to use in photoshop. All the photos I used are all from pexel. (a website)

Pexels (@pexels) | Twitter
pexel website


WHAT I WILL BE DOING TOMORROW / NEXT TIME:


Next time I will be following a tutorial on a simple glow in the dark edit. I chose to do this edit next because I feel like my weakest points when photoshopping is dealing with either colour correction or just using the colour effects in general, so hopefully after tomorrow my understanding of these kinds of effects will be better.


This is the tutorial I'm planning to follow next!

Adobe Photoshop - Day 10 (June Final Post)

WHAT I DID TODAY / WHAT I LEARNED: For my final project, I thought for a while about what I could do. Then I remembered a while back I saw ...